Spanakopita: the iconic traditional Greek Spinach Pie encased in layers upon layers of golden, buttery and flaky filo pastry. For the best Spanakopita of your life, use raw rather than cooked spinach, and bind the phyllo pastry layers using a little finely shredded Greek cheese so they stay together rather than flying everywhere when you cut it!

Spanakopita
If I were to compile the Greatest Hits of dishes I’ve served to friends in recent years, this one shoots straight to the list. It made an appearance at a recent gathering, and to say it was the most popular dish of the night would be an understatement.
It was the first thing to go. There were rave reviews around the table. We were picking at the leftover shards of filo pastry long after the last piece had disappeared.
But the biggest compliment? Silence. To say my group of friends are chatty is a bit of an understatement. So when something renders them totally silent at the table? It’s a serious compliment!! 😂


Ingredients in Spanakopita
Here’s what you need to make this traditional Greek Spinach Pie.
Fresh spinach

Skip the frozen spinach and convenience bags of baby spinach. For the best flavour, the best filling texture, and to ensure the pie base stays crispy, you cannot beat fresh spinach. Sorry folks! You know I always offer convenient alternatives if I think I can get away with it, but in this case, I can’t!
You will need 2 big bunches weighing around 600g/ 1.2lb in total in order to get ~300g/10oz of spinach leaves, once they’re trimmed from the stems.
Other Ingredients
In addition to spinach, here are the other ingredients you need for the Spanakopita filling:

-
Feta – The other key filling ingredient along with spinach. A combination that’s as Greek as it gets!
-
Dill and mint – The fresh herb flavours bring an unmissable taste to Spanakopita. Don’t skip it!
-
Greek yogurt – Or other unsweetened plain yogurt. This is a wet ingredient that makes the filling nice and juicy, but not so wet that it makes the pastry base soggy;
-
Greek kefalotyri cheese – A traditional Greek hard cheese made from sheep or goat’s milk. It tastes somewhat like parmesan but is different and not as salty or sharp. This is used between the filo sheet layers that form the the top of the Spanakopita so they stick together rather than flying everywhere when you cut – neat trick!
It’s sold at Woolworths and Coles in Australia, or European/Greek delis. Don’t fret if you can’t find it, readily-available cheeses like parmesan, pecorino or romano make excellent substitute! Use leftover kefalotyri cheese for Pastitsio, the traditional Greek Pasta Bake;
-
Egg – This is what binds the filling together. Egg is, after all, the best food glue known to mankind!
-
Garlic – Because rarely will you see a Greek dish without garlic (usually much more than just one clove!);
-
Nutmeg – This is the signature spice used in Spanakopita fillings;
-
Cayenne pepper – Just a touch, not to make it spicy, but to provide a hint of warmth. It brings an extra little something-something to this Spanakopita!
-
Lemon – Some zest and juice for brightness;
-
Green onion – For sweetness and its onion-y taste in the filling;
-
Butter – Plenty here, for brushing on each and every layer of the filo pastry! It adds flavour plus keeps each layer separated so you get the signature flakiness. Want to up your Spanakopita game?Use clarified butter instead – the buttery flavour is even more intense!
-
Sesame seeds – To sprinkle on the surface. Using both white and black is a lovely signature look, but you could just double up on one or the other!
Filo pastry for Spanakopita (aka phyllo pastry)
Spanakopita is encased with filo pastry on the base and top. Also known as phyllo pastry, this is a very thin, parchment-like pastry. It is used to make both savoury and sweet pastries and pies in Mediterranean and Middle Eastern cuisines, such as Baklava. It comes frozen or fresh, in the fridge section of grocery stores.

Tips for handling filo pastry
I know some people are a bit intimidated by the thought of working with filo pastry. It can be prone to breaking if not handled correctly. But if you follow a few simple steps, there’s nothing tricky about it at all!
-
Fridge (ie. fresh) filo pastry is easier to handle – It’s more pliable than frozen-then-thawed, so you don’t need to be as careful handling it. Find it in the fridge section of grocery stores, usually alongside fresh pasta;
-
If using frozen filo pastry – Thaw overnight in the fridge. Never try to speed up thawing by placing in a warm environment. It dries the pastry out and makes it brittle so it tends to shatter;
-
Take it out of the fridge 30 minutes beforehand – Whether using frozen thawed or fresh. Bringing it to room temperature makes it more pliable and therefore easier to handle;
-
Keep the phyllo pastry covered with a slightly damp tea towel to ensure it doesn’t dry out; and
-
Handle like tissue paper, ie. with fairy fingers. Don’t manhandle it like a slice of ham!
How to make Spanakopita
It does take time to layer and butter the filo pastry sheets one by one. But a little effort aside, I think you’ll be surprise how straightforward Spanakopita is to make!
Part 1: Filling
The key to the filling is to remove as much water from the spinach as you can so it doesn’t make the pastry base soggy. We do not cook the spinach – the filling flavour is better made with raw rather than cooked spinach. A little tip I picked up from one of the best Greek restaurants in Sydney, Alpha Restaurant!

-
Sweat spinach with salt to remove water – Sprinkle chopped spinach with a little salt, then leave for 10 minutes. The salt will draw moisture out of the spinach which makes it easier to squeeze out the water;
-
Wring out water – Put a handful of spinach on a clean tea towel. Bundle it up and twist firmly to squeeze out the water. It’s easiest to work with a handful at a time so you can do this step properly. I usually do it in 3 batches;
-
Filling – Place spinach with the remaining filling ingredients in a large bowl; and
-
Mix well – Mix filling well until it’s combined. It should be moist and juicy, but you should not see any water leaching out of the spinach into the base of the bowl.
Part 2: Assembling
You sometimes see Spanakopita baked in a pie dish. I prefer it freeform, baked on a tray, because the filo pastry is crispier – the base and sides.

As noted above, I recommend using refrigerated rather than frozen filo pastry because it’s easier to work with. It’s more pliable, and there’s no need to plan ahead and thaw overnight.
-
Trim filo pastry – Take the filo pastry out of the fridge 30 minutes prior to bring it to room temperature. This makes it more pliable and less prone to breaking. Then cut 16 sheets to size: 32 x 25cm / 13 x 10″ (rectangle shapes, pictured) or 26cm / 10.5″ squares.
This makes a Spanakopita pie which is 3.5 – 4cm / 1.4 – 1.6″ thick which I think is the perfect thickness for a good filling to pastry ratio. Any thicker, and there’s too much filling. Any thinner, and there’s too much pastry!
-
The pie base: 8 filo sheets, buttered – Lay a sheet of filo pastry on a baking paper-lined tray, then brush with melted butter. The butter not only adds flavour, it also causes each base layer to separate so you get the signature flakiness;
-
Repeat – After brushing with butter, top with another sheet of filo pastry and continue repeating until you have used 8 sheets in total;
-
Filling – Spread the filling in the middle of the pastry base, leaving a 2.5cm/1″ border. Make the surface as level as possible, pressing down lightly to compact the filling;
-
Brush with butter – Brush the borders of the pastry with butter;
-
The pie top: 5 filo sheets, butter + cheese – Cover the filling with a sheet of filo pastry. Brush with butter then sprinkle with kefalotyri cheese. Cover with another sheet of filo pastry and repeat. Do filo → butter → kefalotyri cheese for the first 5 sheets of filo pastry;
-
Grating kefalotyri cheese – You can either grate the cheese then sprinkle it on with your hand, or measure out the amount of cheese required then grate it straight onto the filo pastry (you get more even coverage this way);
-
The pie top (final sheets): 3 sheets filo, butter only – For filo pastry sheets # 6, #7 and #8, just use butter in between each layer. We skip the cheese for visual reasons; you can see the golden brown bits of cheese under the top layers of the filo otherwise. It also encourages more puffiness for these layers. However it’s really not a big deal if you forget!
Part 3: Finishing

The crimping you see in these steps is optional. It is perfectly acceptable just to press down and seal the edges flat against the tray!
-
Crimp edges – Fold up the edges then use your fingers to crimp them to create little ruffles. See recipe video below for visual demo;
-
Pinch corners firmly to tuck in the surplus filo pastry;
-
Trim the filo pastry all around using scissors so it is around 2cm / 4/5″ high. We don’t want it sticking up too much higher otherwise the ends might become too browned or burn;
-
Butter and sesame seeds – Brush the surface with melted butter, then sprinkle with sesame seeds;
-
Bake 25 minutes in a 220°C/430°F oven. A hot oven is key here to make the pastry beautifully golden and crisp on top and on the base without overcooking the spinach filling!
-
Voila! Set your masterpiece on its serving stage and be prepared for the incredible eating experience about to take place!


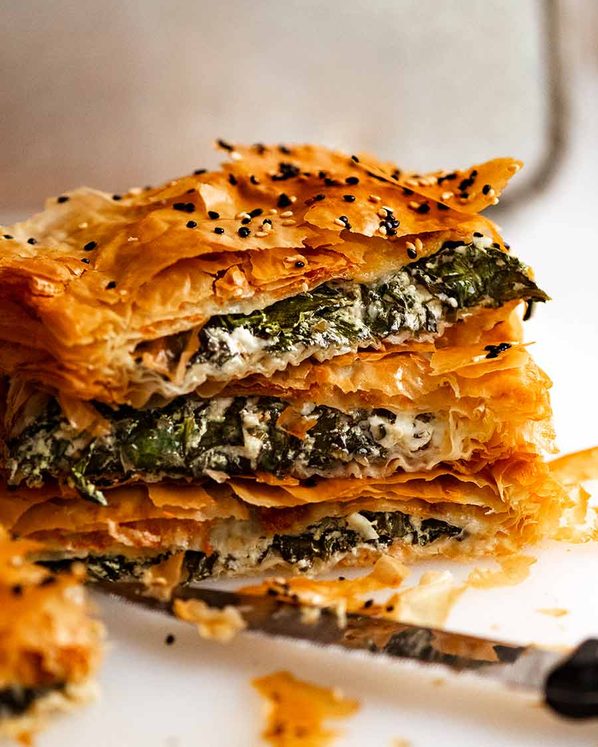
And oh my word … the smell that wafts out from the filling when you cut it open is 100% incredible! The perfume of fresh dill and mint, the fresh spinach, the cheesy goodness of the feta, the subtle notes of nutmeg and garlic … it sends everyone within nose-shot into a salivating stupor!

You can see in the photo above how the filo pastry topping is still ultra-flaky but is still (happily) sitting comfortably atop the Filling. This is thanks to the little trick of layering the filo pastry with a bit of cheese which makes them stick together (while simultaneously still allowing for good, flaky, puffing action) rather than flying everywhere.
Because while we do love that spinach filling, let’s face it: Spanakopita wouldn’t be Spanakopita without that flaky, crispy, buttery and wafer-thin pastry. We love it, and we want lots of it. So if it all fell off when we started cutting up the pie, it would just make us sad wouldn’t it?
Sure, we’d scramble and salvage every little pastry shard we could find off the tray / table / plate. But it really is so much more satisfying when all those layers of filo pastry actually stay ON the Spana, leaving the perfect eating experience intact! Right? 🙂 – Nagi x
PS. It was a wonderful discovery at my “New Years’ Eve (Take 2)” party I held a couple of weeks ago that Spanakopita can be assembled earlier in the day and baked in the evening, and you’d be none the wiser. I was concerned the base might get soggy, but I was wrong. However I’m not convinced you could get as good a result if it’s left in the fridge overnight or frozen (unbaked). I would love to be proven wrong on these points, so please do share your findings in the comment section if you try it!
Watch how to make it
Hungry for more? Subscribe to my newsletter and follow along on Facebook, Pinterest and Instagram for all of the latest updates.

Spanakopita
#wprm-recipe-rating-0 .wprm-rating-star.wprm-rating-star-full svg * { fill: #343434; }#wprm-recipe-rating-0 .wprm-rating-star.wprm-rating-star-33 svg * { fill: url(#wprm-recipe-rating-0-33); }#wprm-recipe-rating-0 .wprm-rating-star.wprm-rating-star-50 svg * { fill: url(#wprm-recipe-rating-0-50); }#wprm-recipe-rating-0 .wprm-rating-star.wprm-rating-star-66 svg * { fill: url(#wprm-recipe-rating-0-66); }linearGradient#wprm-recipe-rating-0-33 stop { stop-color: #343434; }linearGradient#wprm-recipe-rating-0-50 stop { stop-color: #343434; }linearGradient#wprm-recipe-rating-0-66 stop { stop-color: #343434; }
Ingredients
Spinach:
- 300g/10ozEnglish spinach leaves, trimmed from thick stems, thoroughly washed, dried, then chopped into 2.5cm/1″ pieces (Note 1)
- 1/2tspsalt
Filling:
- 175g/6ozGreek feta, crumbled
- 1/2cupGreek yoghurt
- 2green onions / scallions, finely sliced
- 1egg
- 2tbspmint, finely chopped
- 1tbspdill, finely chopped
- 1/2tsplemon zest
- 1/2tbsplemon juice
- 2garlic cloves, finely chopped
- 1/2tspnutmeg, freshly grated
- 1/4tspblack pepper
- 1/4tspsalt
- 1/4tspcayenne pepper
Filo pastry:
- 16sheetsfilo pastry(Note 2)
- 120g/ 8 tbspbutter, melted
- 60g / 2/3 cupGreek Kefalotyri cheese, finely grated (sub parmesan, Note 3)
- 1/2tspwhite sesame seeds(or more black)
- 1/2tspblack sesame seeds(or more white)
Instructions
-
Preheat oven to 220°C/430°F (200°C fan). Line a tray with baking paper / parchment paper.
Filling:
-
Sweat spinach: Place spinach in a large colander or bowl. Sprinkle with salt, toss through. Leave for 10 minutes to sweat.
-
Wring out water: Place a handful of spinach in a tea towel, then wring out tightly to remove excess water.
-
Filling: Place spinach in a bowl with remaining Filling ingredients. Mix well to combine.
Assembly:
-
Trim filo: Cut 16 sheets of filo pastry into 32 x 25cm / 13 x 10″ (pictured) or 26cm / 10.5″ square.
-
8 base layers: Layer 8 sheets of filo pastry on the tray, brushing each layer with melted butter.
-
Filling: Spread filling on filo pastry. Smooth surface and leave a 2.5cm / 1″ border.
-
8 Filo topping layers (Note 4): Cover spinach with a sheet of filo pastry. Brush with butter, sprinkle with Kefalotyri. Repeat for Sheets #2 to #5. Then cover with filo sheets #6 to #8, brushing with butter in between, but do NOT sprinkle with cheese (neater finish).
-
Seal: Press edges down to seal. Crimp and trim if desired (see process steps in post or video) or just leave the edges flat on the tray.
-
Sesame seeds: Brush the top with butter, sprinkle with sesame seeds.
-
Bake: Bake 25 minutes, or until golden brown on the surface.
-
Serve! Serve immediately! It is at its absolute prime fresh out of the oven, though still good as long as its hot (~15 min or so). The base does lose crispiness as it cools.
Recipe Notes:
Nutrition Information:
More Greek classics


Life of Dozer
Typical scene from a road trip up north – Dozer sprawled across the entire back seat. Me, trying to get some work done in the front (passenger 🙂) seat!